Kubeadm K8s cluster with AWS IRSA
cover image source: link
Introduction
In on-premises (self-hosted) Kubernetes cluster, if you want to integrated with AWS to access cloud resources, the most easiest might be use IAM user with access key credential.
However, the credential may be a security concern, you may need to:
- Regularly rotate the credential
- Following the security best practice, you should not pack your credential in your container image.
These steps will be very annoying.
Take an example, if you want to avoid the second point above, you will need some kinds of vault solution such as Hashicorp Vault to store your credential.
However, to access the vault solution service, you still need another credential!
That will be a LOOP!!!
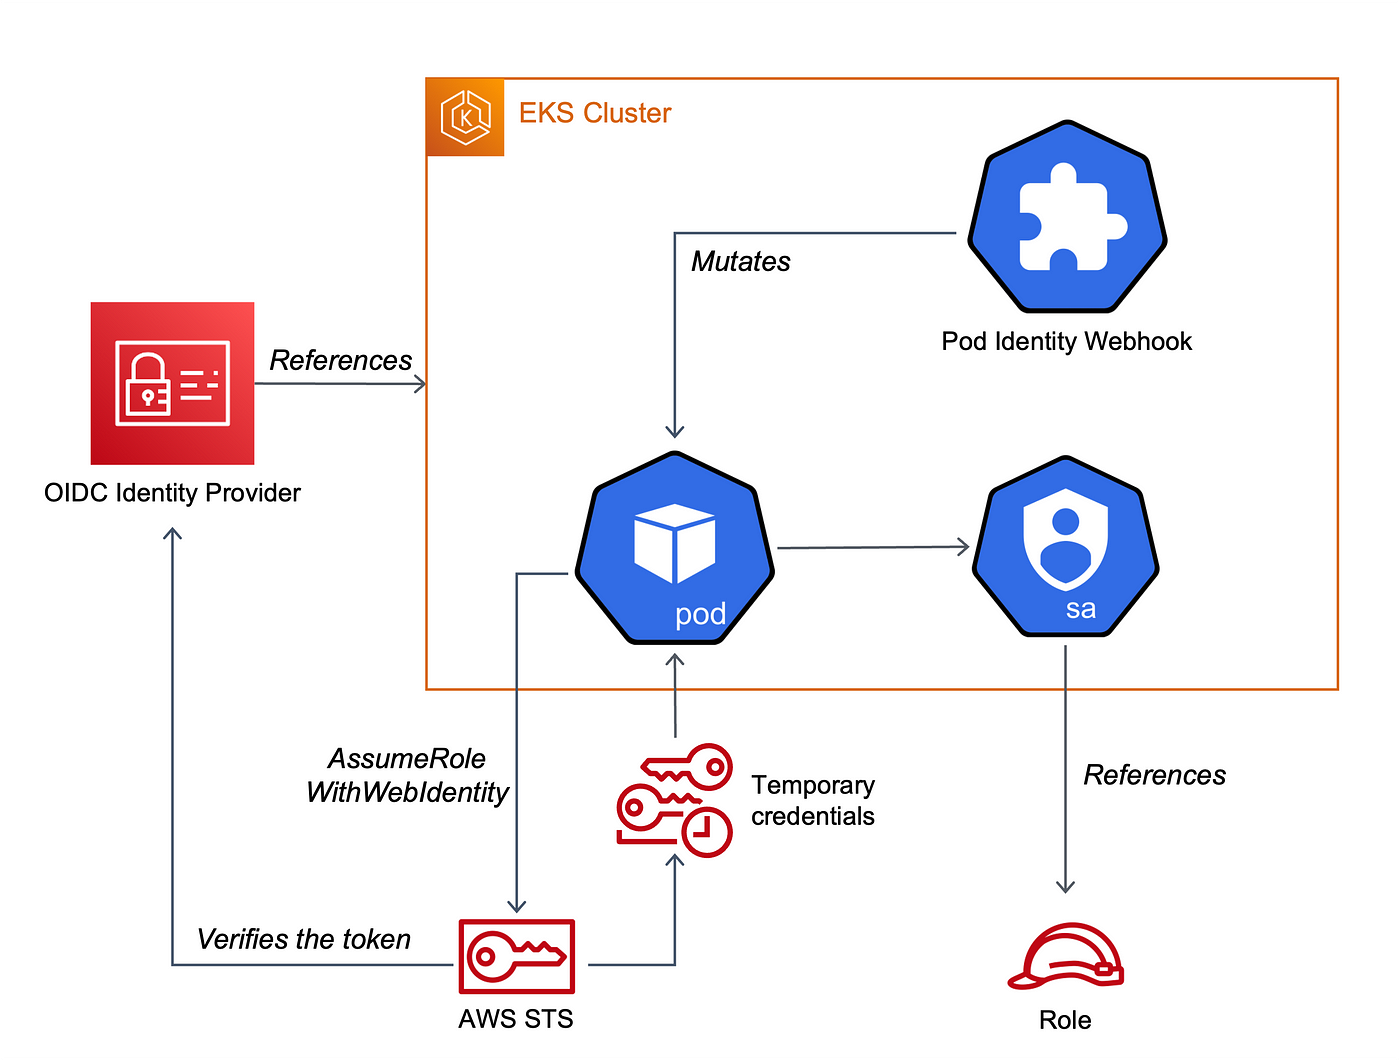
Hence, to avoid this kind of loop, you could try to connect your on-premises Kubernetes cluster to AWS IAM via OpenID to access cloud resource.
This page will show a step by step process for this solution (AWS IAM role service account, IRSA).
Prerequisites
- Kubernetes version >= 1.12
- The
kube-controller-managermust already configured to sign certificate requests. Ensure it is starting with--cluster-signing-cert-fileand--cluster-signing-key-fileparameters and both of them points to a vaild TLS cert and key (detail).
Generate new key pair
First, we need to generate new key pair for signing/verifying projected service account tokens.
You can use ssh-keygen.
# Generate the keypair
PRIV_KEY="sa-signer.key"
PUB_KEY="sa-signer.key.pub"
PKCS_KEY="sa-signer-pkcs8.pub"
# Generate a key pair
ssh-keygen -t rsa -b 2048 -f $PRIV_KEY -m pem
# convert the SSH pubkey to PKCS8
ssh-keygen -e -m PKCS8 -f $PUB_KEY > $PKCS_KEY
Setup public issuer
Since Kubernetes does not have an OIDC discovery endpoint, you will need to host one. The most simple way is to host it on a AWS S3 public bucket.
If you have your own domain, you can then host the following document on Cloudfront + S3 bucket with custom domain.
You will need to host these following two documents.
First document: /.well-known/openid-configuration
Change $ISSUER_HOSTPATH to your public issuer endpoint.
cat <<EOF > discovery.json
{
    "issuer": "https://$ISSUER_HOSTPATH",
    "jwks_uri": "https://$ISSUER_HOSTPATH/keys.json",
    "authorization_endpoint": "urn:kubernetes:programmatic_authorization",
    "response_types_supported": [
        "id_token"
    ],
    "subject_types_supported": [
        "public"
    ],
    "id_token_signing_alg_values_supported": [
        "RS256"
    ],
    "claims_supported": [
        "sub",
        "iss"
    ]
}
EOF
Second document: /keys.json
You can use a go file in this repo to quickly create the keys.json: link
go run ./hack/self-hosted/main.go -key $PKCS_KEY | jq '.keys += [.keys[0]] | .keys[1].kid = ""' > keys.json
This will generate same key twice, one with an empty kid and once populated. You can safely remove the empty kid part, this is for backward compatibility for Kubernetes < 1.16, If your cluster is >= 1.16, you can safely remove it.
So the final keys.json (K8s version >= 1.16) will be like:
{
  "keys": [
    {
      "use": "sig",
      "kty": "RSA",
      "kid": "AAAAAAABBBBCCCC...",
      "alg": "RS256",
      "n": "3124132479878998dfsadFefaAS12318989089...",
      "e": "AQAB"
    }
  ]
}
Setup Kubernetes API Server
Add the follow parameters into /etc/kubernetes/manifests/kube-apiserver.yaml.
For parameter description, please refer here for details.
# Path to the $PKCS_KEY file from the beginning.
#
# This flag can be specified for multiple times.
# There is likely already one specified for legacy service accounts, if not,
# it is using the default value. Find out your default value and pass it explicitly
# (along with this $PKCS_KEY), otherwise your existing tokens will fail.
--service-account-key-file=/etc/kubernetes/pki/sa.pub # This is the origin one
--service-account-key-file=PATH_TO_YOUR_PKCS_KEY # This is the path of new PKCS key you generated at previous step (e.g. /etc/kubernetes/pki/sa-signer-pkcs8.pub).

# Path to the signing (private) key ($PRIV_KEY)
# This parameter can only be defined once.
# You need to comment the origin line and add the following line
--service-account-signing-key-file=PATH_TO_YOUR_PRIV_KEY # Change the value to your private key which generated at previous step

# Identifiers of the API. The service account token authenticator will validate
# that tokens used against the API are bound to at least one of these audiences.
# If the --service-account-issuer flag is configured and this flag is not, this
# field defaults to a single element list containing the issuer URL.
#
# `--api-audiences` is for v1.13+, `--service-account-api-audiences` in v1.12
# Since we are using AWS IAM service account, place the value here to `sts.amazonaws.com`
--api-audiences=sts.amazonaws.com

# The issuer URL, or "https://$ISSUER_HOSTPATH" from above.
# This parameter can be defined multiple times, but please note the precedence.
# The first one is for generate the service account token, and the others are for validating if it is a valid issuer.
# Since we need to generate AWS token for service account, you should place the new public issuer endpoint first.
--service-account-issuer=https://YOUR_PUBLIC_ISSER_ENDPOINT
--service-account-issuer=https://kubernetes.default.svc.cluster.local # This line is the origin line for existing service account, keep it, do not remove.
After complete the update, wait for the api-server pod restart (This process will be automatic, it will watch if the kube-apiserver.yaml file is changed, and then trigger the restart on api-server container.)
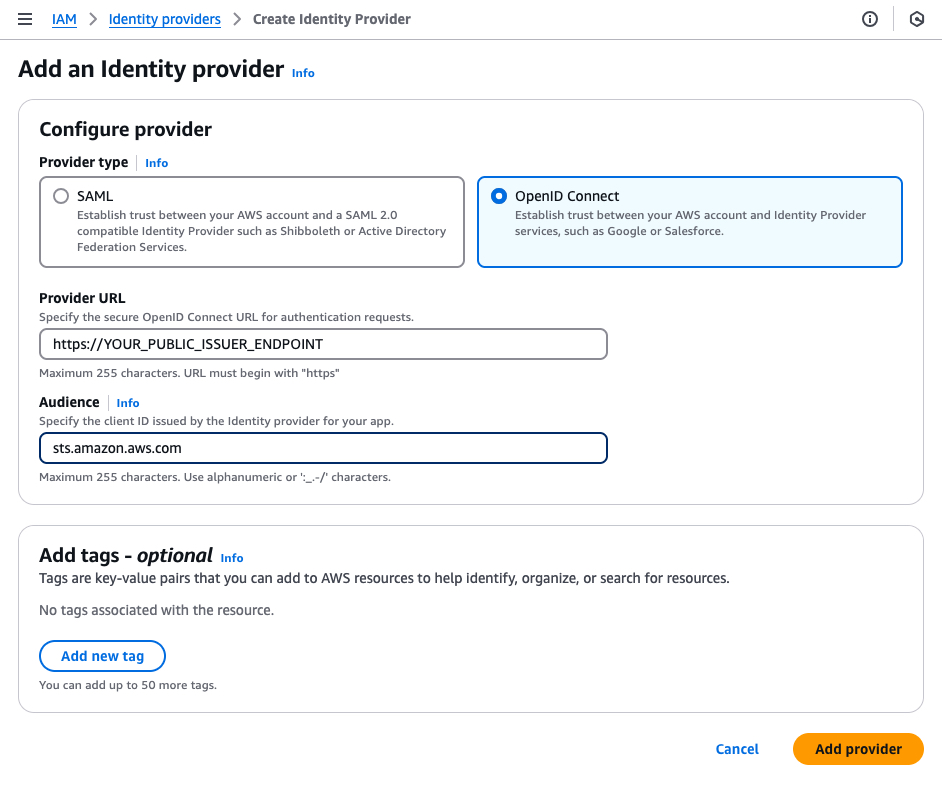
Create identity provider on AWS
Next, you need to create the identity provider on AWS. You can create it manually or via some IaC tools like Terraform.
Via web console
Go to “IAM” -> “Identity providers” -> “Create Identity Provider”
Via Terraform
data "tls_certificate" "k8s_irsa" {
  url = "https://YOUR_PUBLIC_ISSUER_ENDPOINT"
}

resource "aws_iam_openid_connect_provider" "k8s_irsa" {
  url = "https://YOUR_PUBLIC_ISSUER_ENDPOINT"
  client_id_list = [
    "sts.amazonaws.com",
  ]
  thumbprint_list = [
    data.tls_certificate.k8s_irsa.certificates[0].sha1_fingerprint
  ]
}
Deploy the pod identity webhook in your Kubernetes
Follow the steps in the In-cluster installation section to launch the webhook and its required resources in the cluster.
After clone the repo, run: make cluster-up IMAGE=amazon/amazon-eks-pod-identity-webhook:latest
Note: this require you already installed the cert manager in your cluster, since the pod identity webhook will request a self-signed certificate from it.
Verify
After you complete the above steps, we are good to verify it.
Create IAM role for service account
Create an AWS IAM role for your testing service account, below is the terraform example:
data "aws_iam_policy_document" "k8s_test_sa" {
  # allow get caller identity
  statement {
    actions = ["sts:GetCallerIdentity"]
    effect  = "Allow"
    resources = ["*"]
  }
}

resource "aws_iam_policy" "k8s_test_sa" {
  name        = "k8s-test-sa"
  description = "Allow get caller identity"
  policy      = data.aws_iam_policy_document.k8s_test_sa.json
}

resource "aws_iam_role" "k8s_test_sa" {
  name = "k8s-test-sa"
  assume_role_policy = jsonencode({
    Version = "2012-10-17",
    Statement = [
      {
        Effect = "Allow",
        Principal = {
          Federated = aws_iam_openid_connect_provider.k8s_irsa.arn,
        },
        Action = "sts:AssumeRoleWithWebIdentity",
        Condition = {
          StringLike = {
            "${aws_iam_openid_connect_provider.k8s_irsa.url}:sub" = "system:serviceaccount:*:*"
          }
        }
      }
    ]
  })
}

resource "aws_iam_role_policy_attachment" "k8s_test_sa" {
  role       = aws_iam_role.k8s_test_sa.name
  policy_arn = aws_iam_policy.k8s_test_sa.arn
}
Create test workload
Create a test deployment:
---
apiVersion: v1
kind: ServiceAccount
metadata:
  name: irsa-test-sa
  namespace: default
  annotations:
    # Change to your role arn
    eks.amazonaws.com/role-arn: arn:aws:iam::1234567890:role/k8s-test-sa
---
apiVersion: apps/v1
kind: Deployment
metadata:
  name: irsa-test-deployment
  namespace: default
spec:
  replicas: 1
  selector:
    matchLabels:
      app: irsa-test
  template:
    metadata:
      labels:
        app: irsa-test
    spec:
      serviceAccountName: irsa-test-sa
      containers:
      - name: irsa-test
        image: ubuntu:latest
        command: ["/bin/bash"]
        args: ["-c", "apt update && apt install -y less curl unzip && curl 'https://awscli.amazonaws.com/awscli-exe-linux-x86_64.zip' -o 'awscliv2.zip' && unzip awscliv2.zip && ./aws/install && aws sts get-caller-identity;  sleep infinity;"]
        env:
        - name: AWS_DEFAULT_REGION
          value: ap-northeast-1
Save the yaml file, then: kubectl create -f test.yaml
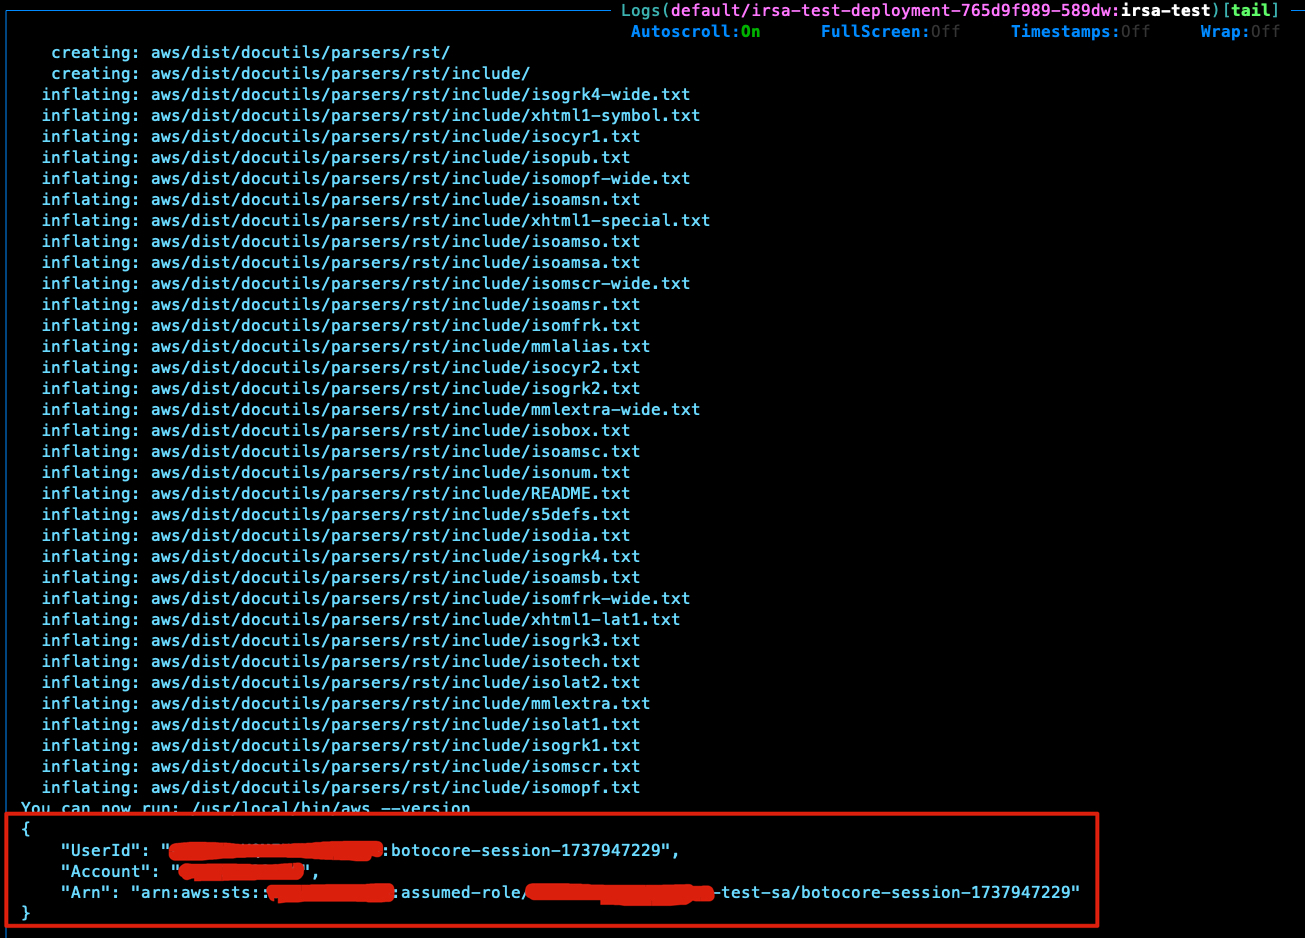
Verify if the get-caller-identity API success
Once you create the test workload, check the output of the pod, it will automatic call the get-caller-identity api.
If everything is fine, you will see an output like this: